1. Sled test reconstruction and CAE correla
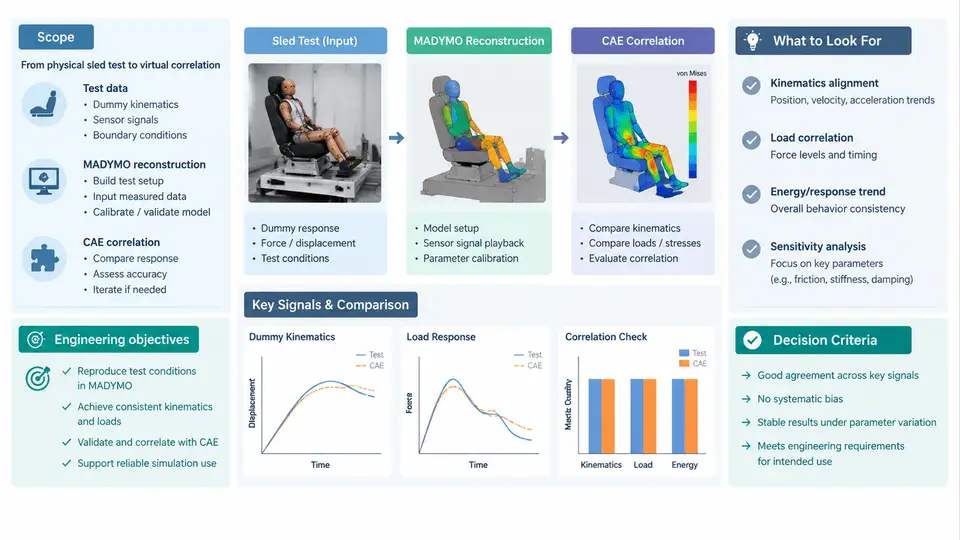
Sled test reconstruction is the engineering practice of reproducing a physical acceleration sled test inside a numerical solver so that the occupant kinematics, restraint loading, and injury metrics observed in the laboratory can be explained, interrogated, and extrapolated. In the MADYMO environment, this means building a multi-body and/or finite-element occupant model, driving it with the measured sled pulse, and then systematically adjusting the model until its predictions match the recorded test data within an agreed tolerance. CAE correlation is the discipline that governs that adjustment: it defines what "match" means, which signals are compared, how errors are quantified, and when a model is considered validated for its intended use.
This course covers the full chain from raw test data to a validated, reusable MADYMO model. It is written for CAE engineers, restraint system developers, and test engineers who already have basic familiarity with MADYMO syntax and occupant safety terminology, but who need a structured, defensible process rather than ad-hoc model tuning.
Why Reconstruction Matters
A sled test produces a limited set of measurements: sled acceleration, belt forces, buckle and anchor loads, seat cushion pressure, and high-speed video of the occupant. These measurements describe what happened, but rarely why. A correlated CAE model fills that gap. Once the model reproduces the test, engineers can vary belt geometry, pretensioner timing, load-limiter force, seat stiffness, or airbag venting and observe the effect on head and chest injury criteria without building a new buck for every iteration.
Reconstruction also serves regulatory and customer-facing purposes. Whether the target is FMVSS 208, ECE R94/R95, Euro NCAP, or an internal OEM requirement, the validated model becomes the evidence base for design decisions and the starting point for variant studies.
Engineering Objectives
A well-scoped reconstruction project pursues four concrete objectives:
- Kinematic fidelity — the model must reproduce occupant trajectory, head excursion, and belt-to-occupant interaction timing as seen in the high-speed video.
- Load fidelity — predicted belt forces, retractor loads, and seat reactions must track the measured channels in both peak magnitude and phase.
- Injury metric fidelity — HIC, chest deflection (or chest acceleration), and femur loads must fall within a defined percentage of the test values.
- Predictive capability — the model must remain stable and physically plausible when parameters are perturbed beyond the calibrated condition.
These objectives are not equally weighted. A model that matches peak HIC but misplaces the timing of head-to-airbag contact by 15 ms is not trustworthy for restraint timing studies, even though its headline number looks good. Correlation therefore always evaluates shape, phase, and magnitude together.
The Reconstruction Workflow
The workflow below is the backbone of this course. Each stage produces a defined artifact that feeds the next, and each stage has its own acceptance criteria.
Stage-by-Stage Detail
Stage 1 — Test data intake. The reconstruction begins with the test report and raw data. The essential inputs are the sled acceleration pulse (usually a filtered accelerometer channel, CFC 60 or CFC 180 depending on the target), belt force channels at retractor and anchor points, buckle load, seat cushion pressure or deflection, and the high-speed video with a known frame rate and calibration grid. The occupant setup — dummy type (Hybrid III 50th, THOR, Q-series), H-point coordinates, seat back angle, belt routing, and pretensioner/load-limiter configuration — must be documented precisely, because these become model boundary conditions.
Stage 2 — Model build. In MADYMO, the sled environment is typically represented by a rigid plane or a prescribed motion applied to the complete system. The seat is modelled with facet surfaces or FE shells, the belt with a combination of belt segments and sliprings, and the dummy with the appropriate MADYMO dummy database model. Airbags are represented by gas-flow or uniform-pressure models with venting and fabric permeability. The critical modelling decision here is the level of detail: a multi-body dummy with facet seat and belt is fast and robust; an FE dummy with FE belt and airbag is slower but captures local deformation. The choice must be justified by the correlation targets.
Stage 3 — Baseline run. The measured sled pulse is applied as a prescribed acceleration or velocity boundary condition. The simulation runs for the full event duration, typically 120–150 ms for a frontal sled test. All channels that exist in the test are recorded at the same sample rate to allow direct overlay.
Stage 4 — Correlation. This is where engineering judgement is most concentrated. Each channel is compared using a combination of visual overlay, peak value error, time-to-peak error, and a quantitative metric such as CORA (CORrelation and Analysis) or a normalized integral error. A typical acceptance target for a frontal occupant model might be CORA ≥ 0.85 for belt forces and ≥ 0.80 for head acceleration, with peak magnitude within ±10% and time-to-peak within ±5 ms. These are example targets; the actual values must be agreed with the project stakeholder before tuning begins.
Stage 5 — Validation and documentation. Once the model passes the agreed criteria, it is frozen, versioned, and documented with the parameter set, the correlation plots, and the known limitations. A model validated for a 50th percentile male in a specific seat is not automatically valid for a 5th percentile female or a different seat geometry.
Stage 6 — Design exploration. The validated model becomes the platform for DOE, optimization, or robustness studies. This is the return on the correlation investment.
What Makes Correlation Difficult
Three issues dominate real projects. First, parameter non-uniqueness: multiple combinations of belt stiffness, friction, and pretensioner timing can produce similar belt force curves. The engineer must use additional channels — video kinematics, seat pressure — to discriminate between them. Second, test variability: two nominally identical sled tests can differ by 5–10% in peak belt force. The model should be correlated to the mean of repeated tests, not to a single outlier. Third, missing measurements: if the test did not measure seat cushion deflection, the model's seat stiffness cannot be directly validated and must be treated as a calibration parameter with a stated uncertainty.
Course Structure and Deliverables
The remaining chapters follow the workflow above in detail. You will build a complete frontal sled reconstruction from a provided dataset, perform a structured correlation, document the result, and run a small DOE on the validated model. The final deliverable is a correlation report containing the model description, the parameter table, the overlay plots with quantitative metrics, and a statement of validated range and limitations.