1. Side impact crash dynamics and occupant
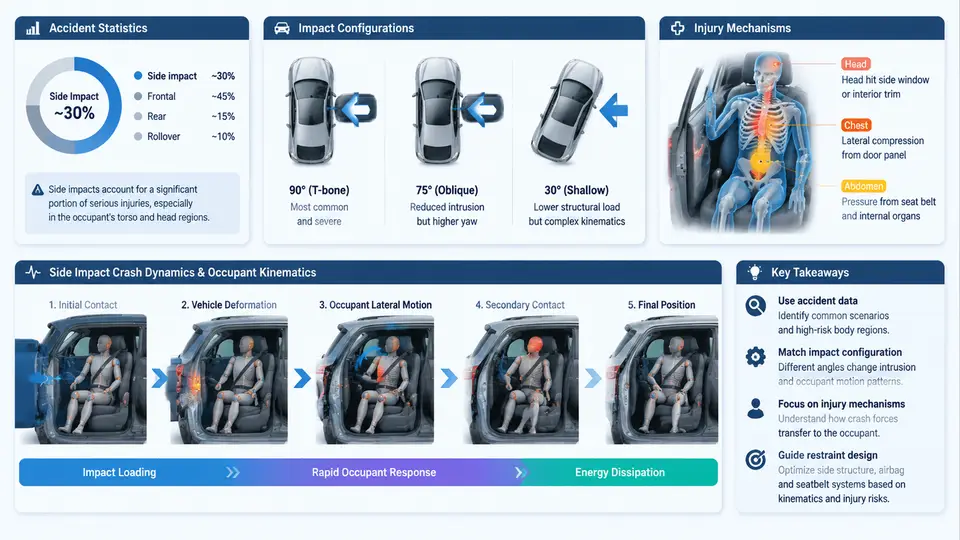
Side impact remains one of the most demanding load cases in occupant restraint development, not because it is the most frequent crash mode, but because the available package space and time are both extremely limited. In a frontal crash, the restraint system has the vehicle's entire front structure as a deformation zone and typically 80–120 ms of occupant ride-down. In a side impact, the striking vehicle or pole intrudes directly into the occupant compartment, and the struck-side occupant may be loaded within 20–40 ms of first contact. This chapter establishes the physical and statistical foundation for everything that follows: how often side impacts occur and in what configurations, how the vehicle and occupant move during the event, and which injury mechanisms the restraint system must ultimately address.
Accident Statistics: Why Side Impact Deserves Dedicated Development
In most mature markets, side impacts account for roughly 20–30% of occupant fatalities in passenger cars while representing a smaller share of all crashes. The fatality rate per exposed occupant is therefore disproportionately high. Field data consistently show that the struck-side (near-side) occupant carries the highest risk, and that head and thorax injuries dominate the serious-injury distribution. Two structural facts explain this: the distance from the door outer panel to the occupant's thorax is often only 200–350 mm, and the struck-side occupant is accelerated laterally by the intruding door rather than decelerated by a belt.
Real-world side impact is also strongly asymmetric in configuration. Intersection collisions — a striking vehicle moving perpendicular to the struck vehicle — are the dominant mode, but oblique impacts, pole/tree strikes, and vehicle-to-vehicle sideswipes each produce distinct loading. Regulatory and consumer tests reflect this spread: a moving deformable barrier (MDB) test represents a car-to-car perpendicular strike, while an oblique pole test represents a narrow-object strike at an angle. Development teams should treat these as a family of load cases rather than a single event, because the restraint countermeasures that help in one may be neutral or harmful in another.
Impact Configurations and the Resulting Load Paths
The essential distinction is between barrier-induced loading and pole-induced loading. An MDB has a broad, deformable face; it loads the door over a large area and tends to push the door trim inward as a relatively coherent surface. A pole concentrates force on a narrow footprint, producing deep local intrusion and a different door deformation pattern, often with a strong vertical component as the pole rides up or down the door structure.
Impact angle matters as much as the obstacle. In a perpendicular (90°) strike, the principal occupant loading is lateral. In an oblique strike (commonly 60–75° from the vehicle's longitudinal axis in test protocols), the occupant experiences combined lateral and longitudinal acceleration, the torso rotates relative to the pelvis, and the head path becomes diagonal. This is precisely the condition in which a side airbag's coverage and the belt's ability to control the pelvis become coupled problems.
Two further parameters shape the event. Striking velocity sets the available kinetic energy and thus the intrusion magnitude; a 50 km/h MDB test and a 32 km/h pole test are not scaled versions of each other, because the pole's small contact area produces far higher local pressure at lower total energy. Struck-vehicle mass and stiffness determine how much of that energy is absorbed by the struck vehicle's own structure versus transferred into occupant compartment motion. A heavier struck vehicle accelerates less but intrudes more slowly; a lighter one is pushed more violently but may deform less locally.
Occupant Kinematics in the First 100 Milliseconds
The occupant's motion in a side impact is best understood as a sequence of couplings rather than a single displacement. Consider a near-side driver in a perpendicular MDB strike, with the vehicle's +Y axis defined as pointing toward the struck (left) side and +X forward. At t = 0 the barrier contacts the door outer panel. Over the next 10–20 ms the door structure deforms and the door trim begins to move inboard in the +Y direction.
Three things then happen nearly simultaneously. First, the occupant's pelvis and lower thorax are loaded directly by the intruding trim and door hardware, since there is no belt path between them and the door. Second, the seat and floor pan transmit the vehicle's lateral acceleration to the occupant's pelvis, so the pelvis begins to move with the vehicle while the upper torso lags. Third, the head, restrained only by the neck and possibly a curtain airbag, continues on its original trajectory and therefore moves relative to the vehicle toward the struck side — the well-known "head lag" that brings the head toward the B-pillar and the incoming glass.
The far-side occupant follows a different pattern. With no direct door loading, the far-side occupant is accelerated by the seat and belt, the torso slides laterally across the seat, and the primary risk becomes head excursion across the centerline and interaction with the far-side interior or the near-side occupant. This is why far-side countermeasures (center airbags, belt pretensioning strategies) are developed as a separate problem from near-side ones.
Injury Mechanisms the Restraint System Must Address
Side impact injuries cluster into three anatomical regions, each with a distinct mechanism and therefore a distinct countermeasure logic.
Thoracic injury is the signature side impact injury. The thorax is loaded by the intruding door trim over a short, broad contact patch, producing rib deflection and, at higher severity, rib fracture with associated aortic and pulmonary injury. The relevant metric in development is chest deflection (or rib deflection in the ES-2re / SID-IIs dummy family), and the physical driver is the relative velocity between the door inner surface and the thorax. A side airbag works by inserting a compliant, pressure-controlled cushion between the two, extending the load path in time and distributing it over a larger area. Its effectiveness depends on being fully deployed before the trim reaches the thorax — which is why side airbag sensing and inflation timing are so tightly coupled to the crash pulse.
Head injury arises from two paths: direct contact with the intruding B-pillar, glass, or door frame, and inertial loading through the neck as the head is accelerated laterally. A curtain airbag addresses the first path by covering the upper interior; the second path is governed by the head's relative motion and is influenced by belt geometry and seat design. In oblique impacts, the head path is diagonal, and coverage gaps between curtain and side airbag become a real risk.
Pelvic and abdominal injury results from direct loading of the pelvis by the door armrest and hardware, and from belt loading in the far-side case. Pelvis loading is difficult to mitigate because there is no room for a cushion between the occupant and the door in many package layouts; the practical levers are door trim energy absorption, armrest geometry, and seat-mounted side airbag coverage extending low enough to protect the pelvis.
From Physics to Development Targets
The practical consequence of this kinematics is a set of timing and coverage requirements that drive the entire restraint system. As an illustrative development target (not a measured result), a near-side thorax airbag in a 50 km/h MDB test might be required to reach full inflation within roughly 15–25 ms of the crash pulse trigger, with the cushion's lower edge covering the armrest region and its upper edge overlapping the curtain airbag. The sensing system must therefore discriminate a side impact from a rough-road event within a few milliseconds, and the inflator must deliver the required gas mass at the required rate.
A useful way to check whether a concept is physically plausible before committing to CAE is to compare the available free distance with the intrusion velocity. If the door trim approaches the thorax at, say, 8 m/s and the free gap is 120 mm, the time to contact is about 15 ms — the airbag must be substantially inflated within that window. This simple estimate, run early with assumed values, quickly exposes concepts that cannot work regardless of how well they are tuned.
With the statistics, configurations, kinematics, and injury mechanisms established, the remaining chapters can treat the restraint system as an engineered response to a well-defined physical problem: a very short time window, a very small distance, and three anatomical regions that must be protected simultaneously by countermeasures that must not conflict with each other.