1. Side impact protection fundamentals
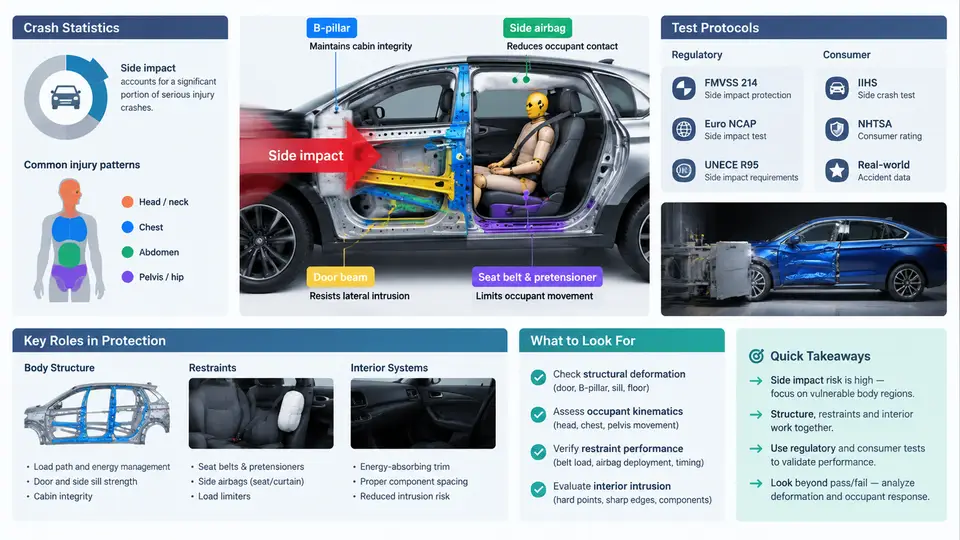
Side impact remains one of the most demanding load cases in occupant protection. Unlike a frontal crash, where the engine bay, longitudinal rails, and a long crush stroke provide substantial deformation distance, a side collision offers only the door, the B-pillar, the rocker, and the seat structure between the striking vehicle and the occupant. The lateral clearance between the occupant's torso and the door trim is typically 100–250 mm, and the struck vehicle is often pushed sideways into a second impact. This geometric reality shapes every engineering decision in side impact protection: energy must be managed over a very short stroke, load must be distributed over a large area of the occupant's body, and the restraint must act within tens of milliseconds.
Crash Statistics and Why Side Impacts Matter
In real-world collision data, side impacts account for roughly 20–30% of occupant fatalities in passenger cars while representing a smaller share of all crashes. The severity distribution is skewed: near-side impacts with a striking vehicle front end produce some of the highest injury risk per event. Fatality risk rises sharply with delta-v above approximately 30 km/h for near-side occupants, and the presence of a rigid pole or a large SUV/truck front end further increases intrusion. Two structural factors dominate outcomes: the amount of occupant compartment intrusion and the peak lateral acceleration transmitted to the occupant. Both are governed by the struck vehicle's side structure and by how quickly the restraint system couples the occupant to that structure.
Injury Mechanisms in Lateral Loading
Lateral loading produces a distinct injury pattern compared with frontal loading. The most life-threatening injuries are thoracic: rib fractures, flail chest, hemothorax, and aortic rupture. The aorta is particularly vulnerable because it is relatively fixed at the ligamentum arteriosum and the diaphragm while the heart and mediastinum can move laterally, creating shear and stretch. Pelvic fractures, acetabular fractures, and liver/spleen injuries are also common. Head injuries occur when the head strikes the intruding door trim, the B-pillar, or the striking vehicle, and when the head undergoes lateral rotation that exceeds brain tolerance.
Two biomechanical metrics are used to quantify thoracic and pelvic loading. The Thoracic Trauma Index (TTI) combines lateral acceleration of the spine and ribs, weighted by age and mass, and is used in US regulation. The VC (viscous criterion) captures the rate-dependent behavior of soft tissue and is used in consumer protocols. For the head, HIC and, in side impact, BRIC (Brain Injury Criterion) address linear and rotational loading respectively. These metrics are not interchangeable; a design that satisfies TTI may still exceed VC limits if the loading is too fast.
Regulatory and Consumer Test Protocols
Three protocol families dominate global side impact validation. FMVSS 214 (US) includes a moving deformable barrier (MDB) test at 54 km/h with a 27° crab angle and a static pole test at 32 km/h. The MDB represents a passenger car front end; the pole test targets head and torso loading against a rigid narrow object. UN R95 (Europe) uses a similar MDB concept at 50 km/h with a different barrier face and a different dummy (EuroSID-2). Euro NCAP and IIHS add more severe configurations: Euro NCAP's side mobile progressive deformable barrier (MPDB) test at 60 km/h with a 1,400 kg trolley, and IIHS's 1,500 kg MDB at 50 km/h plus a 32 km/h pole test. China's C-NCAP uses a 1,400 kg MDB at 50 km/h and a pole test at 32 km/h.
The choice of dummy matters. The ES-2re and ES-2 dummies measure rib deflection, spine and rib acceleration, and pelvic force. The WorldSID 50th provides more biofidelic rib deflection and is increasingly used in consumer protocols. A design validated only with ES-2 may not perform identically with WorldSID because the ribcage compliance and mass distribution differ.
Key protocol parameters at a glance (representative values):
| Protocol | Barrier mass | Impact speed | Dummy | Primary metrics |
|---|---|---|---|---|
| FMVSS 214 MDB | 1,368 kg | 54 km/h | ES-2re | TTI(d), pelvic force |
| FMVSS 214 pole | — | 32 km/h | ES-2re | TTI(d), HIC |
| UN R95 | 950 kg | 50 km/h | ES-2 | Rib deflection, VC |
| Euro NCAP MPDB | 1,400 kg | 60 km/h | WorldSID | Rib deflection, VC, BRIC |
| IIHS side MDB | 1,500 kg | 50 km/h | SID-IIs | TTI(d), pelvic force |
The Three Pillars: Structure, Restraints, Interior
Side impact protection is delivered by three interacting systems. The body structure must absorb and redirect energy while limiting intrusion. The restraint system must couple the occupant to the structure early and distribute load. The interior system must manage contact with the head, torso, and pelvis and provide a controlled interaction surface.
On the structure side, the B-pillar is the primary load path. A typical B-pillar uses tailored hot-stamped boron steel with a soft lower section for energy absorption and a hard upper section for intrusion resistance. The rocker and floor cross-members form a lower load path, while the roof rail and roof cross-members form an upper path. The door beam and door trim transfer load from the barrier to the B-pillar and rocker. A well-designed side structure limits B-pillar intrusion at the occupant reference point to roughly 100–150 mm in a 50 km/h MDB test, though this varies with vehicle class and barrier.
On the restraint side, the side airbag is the central device. A thorax airbag mounted in the seat backrest deploys in 10–20 ms and covers the gap between the occupant and the door trim. A curtain airbag deploys from the roof rail to cover the window opening and the B-pillar, protecting the head. A pelvis airbag or a combined thorax-pelvis airbag addresses pelvic loading. The seat belt pretensioner and load limiter reduce occupant excursion and control belt force, but in side impact the belt's role is secondary to the airbag because the loading direction is largely lateral.
On the interior side, door trim geometry, armrest position, and the seat frame itself influence how load is transferred. A door trim that presents a flat, compliant surface distributes load over the ribcage; a hard point or a protruding armrest concentrates load and can increase rib deflection. The seat frame and the seat-mounted airbag module must be designed so that the airbag deploys into the gap rather than into the occupant.
How the Systems Interact: A Worked Example
Consider a 50 km/h MDB test against a C-segment sedan. At t = 0 ms, the barrier contacts the door outer panel. By t = 5–10 ms, the door beam and B-pillar begin to deform; the door trim starts to move inward. The side airbag crash sensor, typically an accelerometer in the B-pillar or a pressure sensor in the door cavity, must detect the event and trigger deployment within 5–15 ms. By t = 15–25 ms, the thorax airbag is fully inflated and the occupant's torso begins to load the bag. The curtain airbag deploys over 20–30 ms to cover the window and B-pillar. Peak occupant loading occurs around t = 40–70 ms, and the restraint must manage the occupant's lateral velocity while the structure continues to absorb energy.
If the airbag deploys too late, the occupant contacts the intruding door trim directly and rib deflection spikes. If it deploys too early or with excessive pressure, the occupant is pushed back into the seat and then forward again, potentially increasing excursion. The calibration target is a balance: the airbag must be stiff enough to absorb the occupant's kinetic energy but compliant enough to limit rib deflection and VC. Typical targets for a WorldSID 50th in a Euro NCAP MPDB test are rib deflection below 40 mm and VC below 1.0 m/s, though these are protocol-specific and should be confirmed against the current rating requirements.
Engineering tip: When correlating CAE with physical test, always check the timing of airbag deployment relative to the occupant's lateral displacement. A common mismatch is a CAE model that predicts earlier occupant contact than the physical test because the seat cushion and trim compliance are over-stiffened. Adjusting the trim material model and the seat foam properties often resolves the discrepancy.
Design Trade-offs and Failure Modes
Side impact design involves unavoidable trade-offs. A stiffer B-pillar reduces intrusion but increases peak acceleration transmitted to the occupant. A softer B-pillar absorbs more energy but allows more intrusion, reducing the gap available for the airbag. A larger airbag covers more area but takes longer to inflate and may interfere with the seat belt or the occupant's arm. A heavier door beam improves intrusion resistance but adds mass and may shift the vehicle's center of gravity.
Common failure modes include: airbag deployment into the occupant rather than into the gap (caused by module orientation or seat position); curtain airbag not covering the B-pillar (caused by insufficient coverage length or a gap between the curtain and the pillar trim); pelvic loading exceeding limits (caused by a hard armrest or a door trim that concentrates load); and head contact with the B-pillar or roof rail (caused by insufficient curtain coverage or late deployment). Each failure mode has a specific diagnostic path: check the deployment timing from the crash pulse, inspect the post-test dummy for contact marks, and compare the measured deflection against the target.
What to Take Forward
Side impact protection is a system problem. The structure defines the intrusion environment, the restraint defines how the occupant interacts with that environment, and the interior defines the contact surface. Regulatory and consumer protocols define the test conditions and the metrics, but the engineering task is to balance these three pillars against mass, cost, and packaging constraints. The next chapters will examine each pillar in detail, starting with the side structure and its load paths.