4. Child restraint systems (CRS)
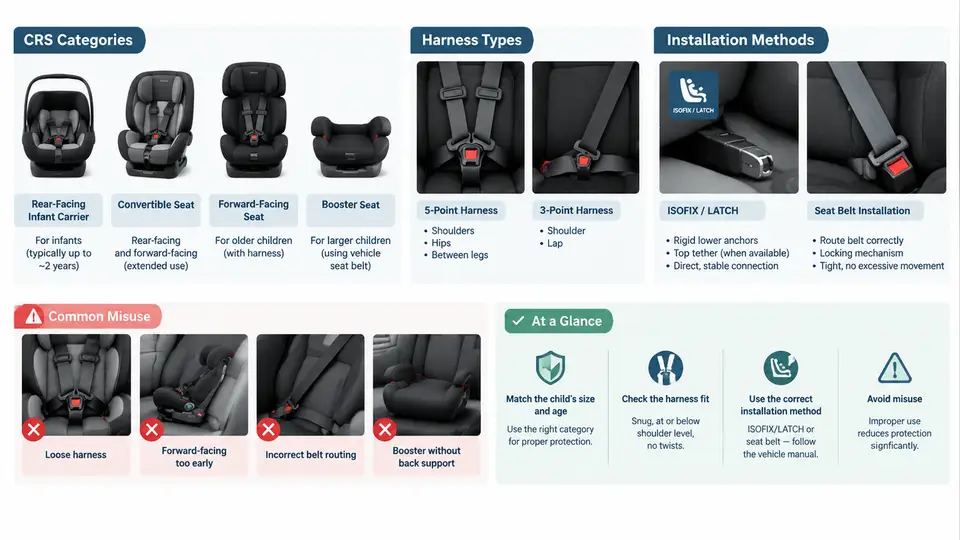
A child restraint system (CRS) is not a scaled-down adult seat; it is an engineered energy-management device whose performance depends jointly on its category, its internal harness or shield, and the quality of its interface with the vehicle. This chapter maps the CRS landscape, explains how each attachment method transfers load into the vehicle structure, and shows why installation errors — not restraint defects — dominate real-world injury risk.
4.1 CRS Categories and Selection Logic
Regulations and manufacturers classify restraints primarily by the child's mass and stature, because the restraint must keep the occupant's head, neck, and torso within load-tolerant limits during a crash pulse. The four practical groups are:
- Group 0 / 0+ (infant carriers, rear-facing): typically rated to 13 kg (Group 0) or 13–18 kg (Group 0+). The rear-facing orientation distributes crash load across the back, shell, and headrest, protecting the disproportionately heavy infant head and weak neck.
- Group I (convertible / combination seats): roughly 9–18 kg. Many units are rear-facing to a mass limit and then rotate to forward-facing; the rotation point is a critical misuse boundary.
- Group II (booster with backrest): approximately 15–25 kg. The seat positions the child so the adult three-point belt crosses the correct skeletal landmarks.
- Group III (backless booster): approximately 22–36 kg. It provides only a belt-routing geometry, relying entirely on the vehicle belt and seat cushion.
Selection is not purely mass-based. Stature, seated height, and the vehicle's seat geometry matter: a tall 4-year-old may exceed a Group I shell's shoulder-slot height before reaching the mass limit, forcing an earlier transition. The governing rule is that the child must remain rear-facing until the shell's mass and height limits are both reached, then forward-facing with an internal harness until those limits are reached, then boosted until the adult belt fits without a booster.
4.2 Harness Types and Load Paths
Three harness families dominate:
- Five-point harness: two shoulder straps, two lap straps, and a crotch strap converge at a central buckle. Load is shared across the pelvis and chest, and the crotch strap prevents the child from submarining under the lap belt. This is the reference configuration for Groups 0–I.
- Impact shield / tray shield: the child is held by a padded shield rather than shoulder straps. Load is spread over the abdomen and thighs. Shields are common on some European Group 0+/I seats but are generally restricted to lower mass ranges because abdominal loading rises with occupant mass.
- Three-point vehicle belt (booster mode): the CRS provides no internal harness; the vehicle's lap-and-shoulder belt is the sole restraint. The booster's job is to route the lap belt across the iliac crests and the shoulder belt across the mid-clavicle, away from the neck and abdomen.
Harness routing is a load-path problem. A shoulder strap that sits too low or too high changes the angle at which the chest is loaded; a loose lap belt allows the pelvis to rotate forward, concentrating force on the abdomen. The harness must be snug — the standard field test is that no more than one finger's thickness of webbing can be pinched at the collarbone.
4.3 ISOFIX / LATCH: Rigid and Flexible Attachment
ISOFIX (ISO 13216) and its North American counterpart LATCH (Lower Anchors and Tethers for Children) replace the adult belt as the primary CRS-to-vehicle interface. The system has two parts: lower anchorages (two bars at the seat bight, spaced 280 mm nominal) and a top tether anchor. The top tether is not optional in most installations — it limits forward rotation of the CRS shell and reduces head excursion.
Two attachment hardware types exist:
- Rigid ISOFIX: the CRS carries two fixed or retractable arms that latch directly onto the anchor bars. The rigid connection minimizes relative motion between CRS and vehicle, which is why it is preferred for rear-facing infant seats.
- Flexible LATCH / ISOFIX: the CRS uses webbing straps with connectors. It is lighter and easier to fit across vehicles, but the straps must be tensioned correctly; slack reintroduces the very motion the system is meant to eliminate.
ISOFIX/LATCH has a mass limit. Most manufacturers cap lower-anchor use at 18 kg (child mass) or 33 kg (child plus CRS), after which the adult belt must be used. The top tether, however, should remain connected whenever an anchor is available.
4.4 Seat Belt Installation
When ISOFIX is unavailable or the mass limit is exceeded, the adult belt is the interface. Two routing modes exist:
- Rear-facing belt path: the belt passes through guides on the CRS base or shell, and the seat is tensioned by pressing down while pulling the belt tight. A locking clip or the vehicle's belt retractor lock (ALR/ELR) must hold tension.
- Forward-facing belt path: the belt routes through the CRS's forward-facing guides, and the top tether is connected. The belt must be locked; a belt that can still pay out webbing will let the CRS pitch forward.
The verification test is displacement: with the belt locked, grasp the CRS at the belt path and push/pull firmly. Less than 25 mm (1 inch) of movement at the belt path is the accepted field criterion. More than that indicates slack, a mis-routed belt, or an unlocked retractor.
- Confirm CRS category matches child mass and stature.
- Route belt or ISOFIX connectors through the correct path for the orientation.
- Lock the belt (ALR/ELR or locking clip) or confirm both ISOFIX connectors clicked.
- Connect and tension the top tether.
- Push/pull at the belt path: movement must be < 25 mm.
- Check harness snugness: ≤ 1 finger at the collarbone.
- Confirm the harness slot is at or just below shoulder level for rear-facing, at or just above for forward-facing.
4.5 Misuse Implications
Misuse is the dominant modifiable risk factor in CRS crashes. Common errors and their consequences:
| Misuse | Mechanism | Consequence |
|---|---|---|
| Loose harness / loose belt | Occupant excursion increases before restraint engages | Higher head and chest acceleration; ejection risk |
| Harness slot too low (forward-facing) | Shoulder load applied below the clavicle | Spinal compression, submarining |
| Top tether not connected | CRS shell rotates forward | Increased head excursion, contact with vehicle interior |
| ISOFIX used above mass limit | Anchor and connector overload | Connector release, CRS separation |
| Belt routed outside guide | Load path bypasses CRS structure | CRS rotates or slides; belt loads abdomen |
| Booster with shoulder belt under arm | No upper-body restraint | Head/neck impact, abdominal loading |
Misuse is not random. Studies consistently show that the highest error rates occur at the transition points — switching from rear-facing to forward-facing, from harness to booster, and from ISOFIX to belt. These are exactly the moments when the caregiver is least practiced and the instructions are least consulted.
The diagram above shows the three load paths that must all be correct for a CRS to perform as designed: the internal harness (red), the lower anchor or belt interface (blue), and the top tether (purple). A failure in any one path shifts load to the others and typically produces the misuse signatures listed in the table.
In practice, a validation engineer or child passenger safety technician should treat every installation as a fresh verification task. The category determines the allowable load path; the harness type determines how occupant load is distributed; the attachment method determines how that load enters the vehicle; and misuse at any of these three levels degrades the entire chain. The field checklist and the load-path diagram in this chapter are the minimum tools for catching the errors that matter most.