1. Systematic Reading of an Ankle Radiograp
Why a Fixed Reading Order Matters
An ankle radiograph is a dense superposition of three bones (tibia, fibula, talus), two joint spaces (tibiotalar, distal tibiofibular syndesmosis), and a soft tissue envelope that changes shape with even small effusions. Under time pressure, the eye is drawn to the most obvious abnormality and the rest of the film is never systematically inspected — the classic mechanism behind missed posterior malleolar fragments, syndesmotic widening, and subtle talar dome lesions. A structured reading routine removes that failure mode by forcing every region to be checked in the same order on every film, so that "nothing else found" is a conclusion you reached, not an assumption.
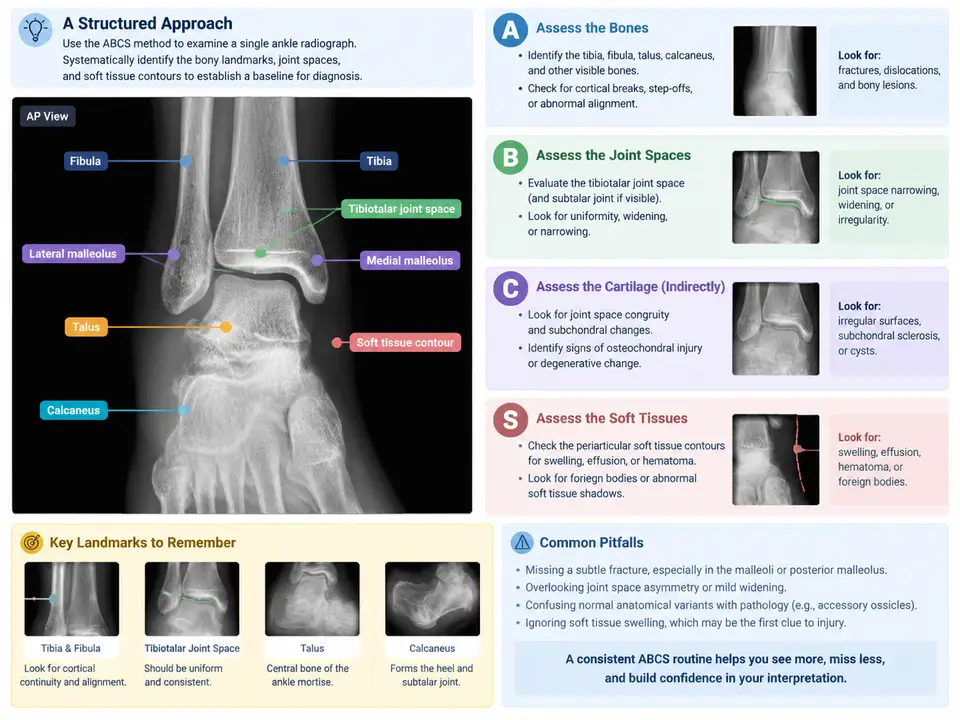
This case establishes that routine using the ABCS framework — Adequacy/Alignment, Bones, Cartilage (joint spaces), Soft tissues — applied to a single AP (mortise) ankle radiograph. The goal is not to diagnose a specific injury but to build a repeatable baseline: name the landmarks, trace the contours, and record findings in a fixed sequence so that later cases (fracture localization, Ottawa rules, syndesmotic injury) can be layered on top of a reliable habit.
The Reference Film and Its Projection
Work through the following teaching example. It is a hypothetical normal AP mortise view used to demonstrate the routine; the described appearances are the expected normal anatomy, not measurements from a real patient.
- Projection: AP mortise view, ankle in ~15–20° internal rotation, so the lateral malleolus is projected clear of the talus and the mortise is opened.
- Exposure/adequacy: distal tibia and fibula, entire talar dome, and the base of the 5th metatarsal should be visible; the cortex should be sharp enough to trace without burnout.
- Patient: adult, skeletally mature (physes closed), no prior hardware.
Before reading any structure, confirm adequacy. If the talar dome is cut off or the mortise is closed by under-rotation, the film cannot support a negative conclusion and should be repeated rather than "read around."
Step A — Adequacy and Alignment
Alignment is assessed on lines, not on impressions. Trace three continuous contours:
- Medial clear space: the gap between the medial malleolus and the medial talar border. On a correctly positioned mortise view it should be uniform and comparable to the superior clear space; widening suggests lateral shift of the talus.
- Tibiofibular overlap: on the mortise view the distal fibula should overlap the lateral tibial border by a small, consistent amount. Loss of overlap or an abnormally wide tibiofibular clear space points to syndesmotic disruption.
- Tibiotalar congruity: the talar dome should sit concentrically under the tibial plafond, with the joint space of even height across its width.
Record each as normal / widened / narrowed / incongruent. This is the step most often skipped, and it is where syndesmotic and instability findings hide on an otherwise "unremarkable" film.
Step B — Bones: Landmarks and Cortical Tracing
Move systematically around the bony ring rather than staring at the center. For each landmark, trace the cortex as a continuous line and note any step, lucency, or impaction:
| Landmark | What to trace | Common subtle finding |
|---|---|---|
| Lateral malleolus (distal fibula) | Lateral cortex and tip | Transverse or oblique lucency at or below the joint line |
| Medial malleolus | Medial cortex and tip | Vertical lucency, avulsion at the tip |
| Tibial plafond | Articular surface line | Impaction, subtle step |
| Talar dome | Convex articular contour | Osteochondral defect, flattening |
| Talar neck/body | Lateral and medial borders | Occult fracture line |
| Base of 5th metatarsal | Lateral cortex | Avulsion fracture (must be on film) |
Two habits sharpen this step. First, follow each cortex past the point where it looks normal — fractures often begin where attention drops. Second, compare the two malleoli: an isolated lucency is easy to dismiss, but asymmetry between the medial and lateral cortices is a reliable prompt to look again.
Step C — Cartilage and Joint Spaces
Cartilage is read as the space between bones. On the mortise view, check the tibiotalar joint space for uniform height, then the medial clear space and the tibiofibular clear space as described in Step A. A joint space that is uniformly preserved with congruent contours supports a normal reading; focal narrowing, widening, or a step in the subchondral line is a positive finding to record. Note that joint space assessment and alignment overlap — read them together, but record them separately so a widened medial clear space is not lost inside a general "alignment normal" note.
Step S — Soft Tissues
Soft tissue is the most frequently ignored compartment and often the earliest sign of injury. Trace the skin and subcutaneous contour on both sides of the ankle:
- Lateral soft tissue: look for convex bulging over the lateral malleolus, which suggests effusion or hematoma even when the bone looks intact.
- Medial soft tissue: symmetric assessment; asymmetric swelling localizes the injury side.
- Anterior/posterior joint capsule: a teardrop-shaped soft tissue density displaced away from the joint suggests a joint effusion.
Record soft tissue as symmetric / asymmetric swelling / effusion sign present. This step converts a "normal bones" film into a complete reading and flags the films that deserve closer bony scrutiny.
Reading the Map: How the Four Stages Interlock
The diagram above is the routine itself, not a summary of it. Two features deserve emphasis. First, the stages are ordered but not independent: a positive finding in any stage sends you back to re-examine the bones and joint spaces with that finding in mind — the dashed feedback path. A widened medial clear space (Stage A) should trigger a deliberate re-trace of the lateral malleolus and syndesmosis (Stage B), because the alignment abnormality is the clue and the fracture is the cause. Second, the output is a fixed-order report, not a free-text impression. Writing "A: … B: … C: … S: …" on every film makes omissions visible: a blank stage is an unfinished stage.
Applying the Routine to the Reference Film
Working the teaching film through the four stages produces the following expected normal record. Treat these as the appearances a normal mortise view should show, and use them as your comparison template for later cases.
| Stage | Observation on the reference film | Recorded entry |
|---|---|---|
| A — Adequacy/Alignment | Talar dome and 5th metatarsal base included; mortise opened; medial clear space uniform and equal to superior clear space; tibiofibular overlap present | Adequate; alignment congruent |
| B — Bones | Lateral and medial malleolar cortices continuous; plafond line smooth; talar dome convex and intact; no lucency or step | No fracture or cortical step identified |
| C — Cartilage/Joints | Tibiotalar joint height uniform across the dome; no focal narrowing; syndesmotic clear space within normal range | Joint spaces preserved and uniform |
| S — Soft tissues | Medial and lateral contours symmetric; no convex bulging; no displaced joint effusion density | Soft tissues symmetric; no effusion sign |
Verification and Common Failure Points
You have completed the routine correctly when you can point to each landmark on the image and state its status without re-looking, and when your written record has four populated stages. The following are the recurring errors this routine is designed to catch:
- Reading a non-diagnostic film. If the mortise is closed or the talar dome is cut off, stop and repeat the projection; do not record "normal" from an inadequate image.
- Stopping at the first normal cortex. Trace each cortex past the point of apparent normality; fractures often begin at the edge of attention.
- Treating alignment as an impression. Measure the medial clear space and tibiofibular overlap rather than eyeballing "looks aligned."
- Skipping soft tissue. Asymmetric swelling with intact bones is a positive finding and a prompt for closer bony review, not a reason to close the case.
- Free-text reporting. An unstructured impression hides the stage you forgot; the fixed A/B/C/S order makes the omission visible.