1. Course overview
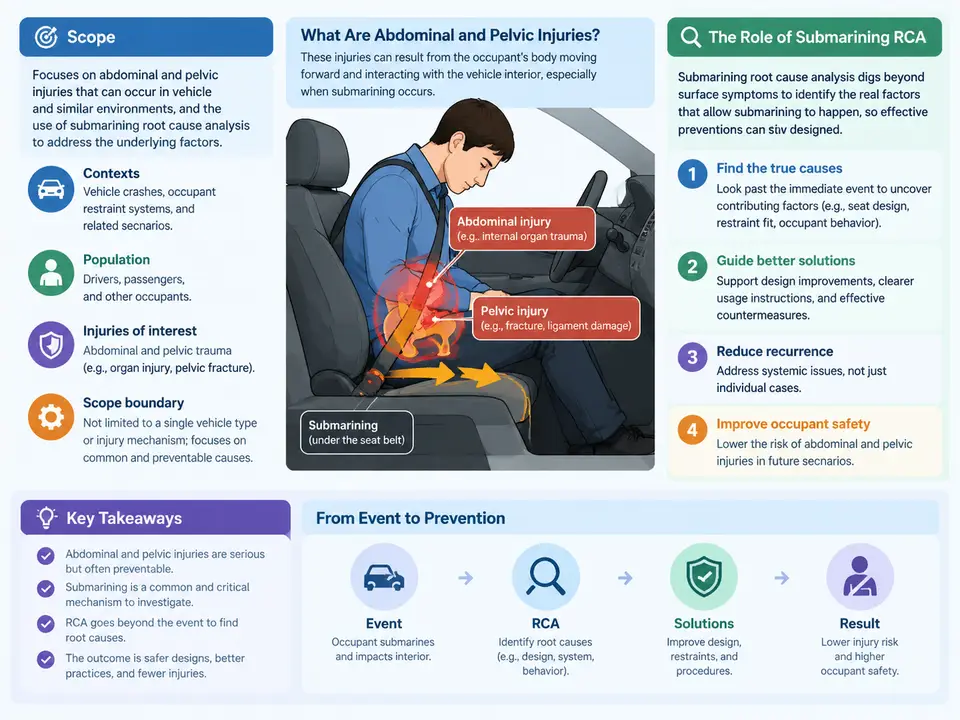
Abdominal and pelvic injuries remain among the most consequential outcomes in frontal and frontal-oblique crashes, yet they are also among the least visible in the field. Unlike head, chest, or femur responses, which are monitored by mature, well-validated injury criteria and instrumentation, the abdomen and pelvis sit in a region where restraint loading, occupant kinematics, and structural intrusion interact in ways that are difficult to observe and easy to misattribute. This course addresses that gap directly. It treats abdominal pelvic injury and submarining not as separate topics but as a single causal system: submarining is the dominant kinematic mechanism by which restraint systems fail to protect the pelvis and abdomen, and abdominal pelvic injury is the outcome that mechanism produces.
The scope of the course spans the full engineering chain. It begins with injury biomechanics — the anatomy of the pelvis, the abdominal organs, and the load paths that produce injury — and moves through restraint system architecture, occupant classification, seat design, and the regulatory and consumer-test environments in which submarining is evaluated. From there it develops a disciplined root cause analysis methodology: how to recognize submarining in physical and virtual tests, how to separate kinematic evidence from injury evidence, how to build and test causal hypotheses, and how to convert findings into design countermeasures that are verifiable rather than merely plausible.
Why Submarining Deserves Its Own Analytical Discipline
Submarining occurs when the occupant's pelvis migrates forward and downward beneath the lap belt during a crash, allowing the belt to load the abdomen instead of the anterior iliac spines and the pelvic bone structure. The kinematic signature is subtle: the lap belt may appear to be positioned correctly at the start of the event, and the occupant may remain visually contained within the restraint envelope. What changes is the relationship between the belt and the pelvis over time. Once the pelvis has slipped under the belt path, the belt rides up onto the soft abdominal tissue, and the resulting loading produces a distinct injury pattern — bowel and mesentery injury, lumbar spine distraction, and in severe cases pelvic ring disruption from atypical load paths.
This subtlety is precisely why root cause analysis cannot be reduced to a checklist. A test that shows elevated abdominal injury metrics may have been caused by belt geometry, seat cushion angle, occupant size and posture, pretensioner timing, buckle anchor position, or any combination of these. The same observable outcome can arise from materially different causal chains, and the countermeasure that resolves one chain may be irrelevant to another. The analytical discipline this course teaches is the ability to distinguish among these chains using evidence rather than assumption.
Framing principle for the course: Submarining is a kinematic event with an injury consequence. Root cause analysis must therefore explain both the motion and the outcome, and must show how the two are linked by a specific load path. Any analysis that explains only one of the two is incomplete.
The Analytical Workflow at a Glance
The diagram below shows the causal structure that the course builds around. It is deliberately not a linear procedure. It is a relationship map: occupant and restraint inputs produce kinematics, kinematics determine belt-to-pelvis engagement, engagement determines load path, and load path determines injury outcome. Root cause analysis works backward along these links, and countermeasure development works forward.
What the Course Objectives Require of You
By the end of the course, you should be able to do four things at a professional level. First, explain the injury biomechanics of the abdomen and pelvis with enough precision to interpret injury metrics and post-test findings rather than merely report them. Second, evaluate a restraint and seat system for submarining risk using both physical test evidence and CAE correlation, including the ability to read occupant kinematics from high-speed video and belt force traces. Third, conduct a structured root cause analysis that produces a defensible causal chain, distinguishes contributing factors from the primary mechanism, and identifies the evidence that would falsify each hypothesis. Fourth, translate the analysis into countermeasures — geometry changes, pretensioner strategy, seat pan design, anti-submarining features — and define the verification evidence that demonstrates the countermeasure actually addresses the identified cause.
These objectives are deliberately stated as capabilities rather than topics. Knowing that submarining exists is not the same as being able to determine, in a specific test with ambiguous evidence, whether the pelvis slipped under the belt or the belt was never properly engaged to begin with. The course is structured to build that discrimination.
How the Analysis Fits Into Occupant Safety Engineering
In the broader occupant safety workflow, submarining root cause analysis occupies a specific and often underdeveloped position. Restraint design proceeds from requirements to concepts to CAE optimization to physical validation. When a validation test produces an adverse result — elevated abdominal pressure, an unexpected pelvic fracture pattern, a lap belt that has migrated — the engineering response is frequently to adjust a parameter until the metric improves. That response can produce a passing test without producing an understanding. The risk is that the same causal mechanism reappears in a different build, a different occupant size, or a different crash pulse, and the team has no model of why the original fix worked.
Root cause analysis inserts a disciplined explanatory step between observation and countermeasure. It asks what the evidence actually shows about belt-pelvis engagement, what alternative explanations are consistent with the same evidence, and what test or simulation would discriminate among them. In practice this means treating high-speed video, belt force time histories, pelvic acceleration, and injury metrics as a coordinated evidence set rather than independent pass/fail channels. A lap belt force trace that rises early and remains high while pelvic forward excursion exceeds the expected belt-pelvis coupling is a different signature from a trace that rises late because the belt was slack. The two point to different causes and different fixes.
Practical orientation: Throughout the course, examples use representative occupant sizes (for example, a 5th percentile female and a 50th percentile male), representative belt geometry, and illustrative parameter values. These are teaching examples chosen to make the reasoning concrete. They are not reported test results, and they should not be cited as validation data. Where a real analysis would require measured data, the course identifies what data must be collected and how it is used.
The Structure Ahead
The course moves from mechanism to method to application. Early chapters establish the anatomy, injury tolerances, and regulatory landscape that define what must be protected and how protection is judged. The middle chapters develop the kinematics of submarining, the restraint and seat parameters that govern it, and the test and simulation environments in which it is observed. The later chapters build the root cause analysis methodology in detail — evidence collection, hypothesis construction, discrimination testing, and countermeasure verification — and apply it to worked cases. Each chapter is designed to stand on its own while contributing to a single analytical capability: the ability to explain, with evidence, why a restraint system failed to protect the pelvis and abdomen, and to demonstrate that the corrective action addresses that specific failure.
The measure of success for this course is not familiarity with submarining terminology. It is the ability to look at an ambiguous test result and reason your way to a defensible causal explanation, then design the verification that proves you were right.