1. Course overview
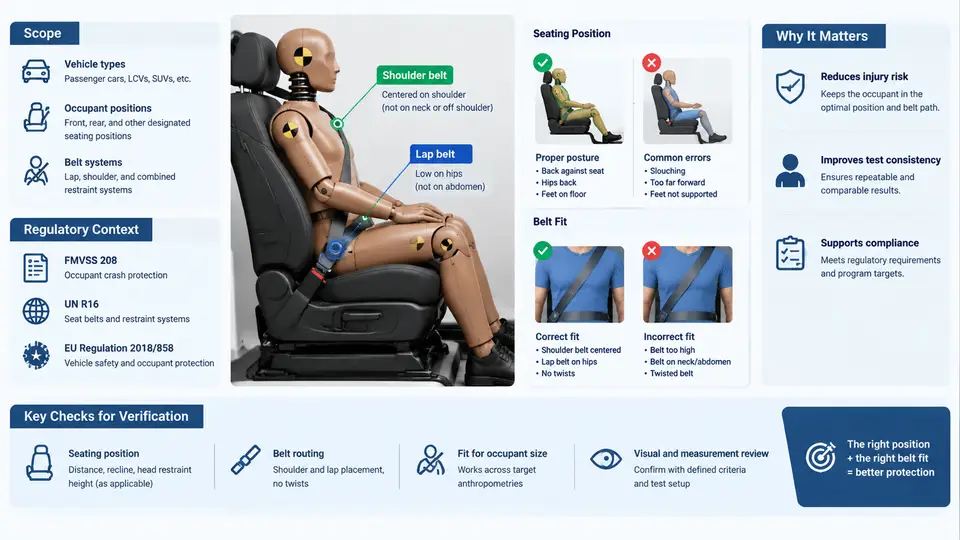
Occupant protection in a crash begins long before the airbag fires. It begins with where the occupant sits and how the seat belt lies across the body. A restraint system is engineered around a nominal occupant posture and a nominal belt geometry; when either deviates, the protection margin shrinks. This course addresses the discipline of seating position and belt fit verification — the measurement, analysis, and documentation work that confirms an occupant is positioned, and the belt is routed, in a way the restraint system was designed to protect.
The scope is deliberately narrower than full occupant packaging or full restraint CAE. It covers three interlocking questions: Where is the occupant seated relative to the vehicle reference frame? How does the belt contact the body? And does that combination remain acceptable across the population of occupants and seat adjustments the vehicle must serve? Answering these questions requires physical measurement with standardized tools, geometric modeling, and a clear understanding of which regulatory and consumer-test protocols define "acceptable."
Why seating position and belt fit are safety-critical
Frontal airbags are tuned to deploy into a defined occupant envelope. Sitting too close to the steering wheel places the chest in the airbag's early-deployment path; sitting too far reclined lets the occupant submarine beneath the lap belt. The lap belt should load the pelvis across the anterior superior iliac spines (ASIS), not the abdomen. The shoulder belt should cross the mid-clavicle and sternum, not the neck or the upper arm. Each of these is a geometric condition, and each can be measured.
Regulation and consumer programs encode these conditions. FMVSS 208 defines test positions and specifies that the driver and passenger be positioned per the vehicle manufacturer's instructions, with defined seat-track and seat-back angles for the belted and unbelted barrier tests. FMVSS 209 and 210 govern belt assembly and anchorage strength and location. ECE R16 and R14 mirror much of this in the European framework, while Euro NCAP and other consumer protocols add their own positioning procedures and belt-fit assessments. The common thread: the test dummy's position and the belt's path are prescribed, and a vehicle that cannot reproduce those conditions consistently cannot be validated against them.
The verification workflow at a glance
Verification is not a single measurement but a chain from definition to judgment. The figure below shows the core relationships: the occupant and seat define a position, the belt routing defines a fit, and both feed a compliance decision against regulatory and internal criteria. Measurement tools and the reference frame sit underneath as the shared basis for every number produced.
What "verification" actually involves
In practice, verification combines physical measurement and geometric analysis. On the physical side, an H-point machine (the SAE J826 device) establishes the seat's H-point and the torso and thigh angles for a given seat-track position and back-angle setting. A FARO arm or similar coordinate measurement device records belt anchor locations, D-ring height, and webbing contact points in the vehicle frame. A belt-fit manikin — a simplified physical representation of the occupant torso and pelvis — allows repeatable assessment of where the lap and shoulder belt actually lie.
On the analytical side, the same geometry is reconstructed in CAD or a occupant-packaging model. The value of doing both is cross-check: physical measurement catches build variation and trim effects that CAD misses, while the model lets engineers sweep the population and seat adjustments far faster than physical trials allow.
Consider a representative example. A mid-size sedan's driver seat is set to the mid-track position with a 25° seat-back angle. The H-point machine reports an H-point 12 mm rearward and 8 mm lower than the design intent. The belt-fit manikin shows the lap belt passing 30 mm above the ASIS on the outboard side, edging toward the abdomen. Neither number alone is alarming, but together they indicate the occupant sits lower and further back than designed, and the lap belt has migrated upward — a combination that raises submarining risk in a frontal impact. The corrective action is not to adjust the dummy; it is to investigate the seat cushion build, the buckle stalk length, and the anchor geometry, then re-measure.
Regulatory and program context
The regulatory context defines the floor, not the ceiling. FMVSS 208's positioning procedures tell you how the dummy must be placed for the compliance test; if your vehicle's belt geometry cannot hold that placement, the test result is not representative of the design. ECE R16 specifies belt anchorage locations relative to the H-point and seat reference, which directly constrains where the belt can sit on the body. Consumer programs such as Euro NCAP and IIHS add belt-fit and positioning assessments that go beyond the minimum, and OEM internal targets typically tighten the tolerances further.
| Reference | What it governs | Verification implication |
|---|---|---|
| FMVSS 208 | Occupant positioning for barrier tests; belt use conditions | Dummy placement must be reproducible from the seat and belt geometry |
| FMVSS 210 | Seat belt assembly anchorages | Anchor locations constrain achievable belt fit |
| ECE R16 / R14 | Belt installation and anchorage strength/location | H-point-relative anchorage zones define the design envelope |
| Euro NCAP / IIHS | Consumer belt-fit and positioning assessment | Stricter targets; worst-case adjustment must be checked |
How this course is organized
The chapters that follow build from foundations to application. Early chapters establish the reference frames, the H-point concept, and the measurement tools. The middle section develops belt-fit assessment methods, population coverage, and the treatment of seat adjustment extremes. Later chapters address documentation, tolerance management, and the integration of verification results into the broader restraint development process. By the end, you should be able to plan a verification campaign, execute the key measurements, interpret the results against the applicable criteria, and document a defensible compliance judgment.
The through-line is simple: an occupant is protected when the restraint system meets the body where it was designed to. Seating position and belt fit verification is how you prove that meeting happens — repeatably, across the population, and against the standards that matter.