1. Load path fundamentals in near-side impa
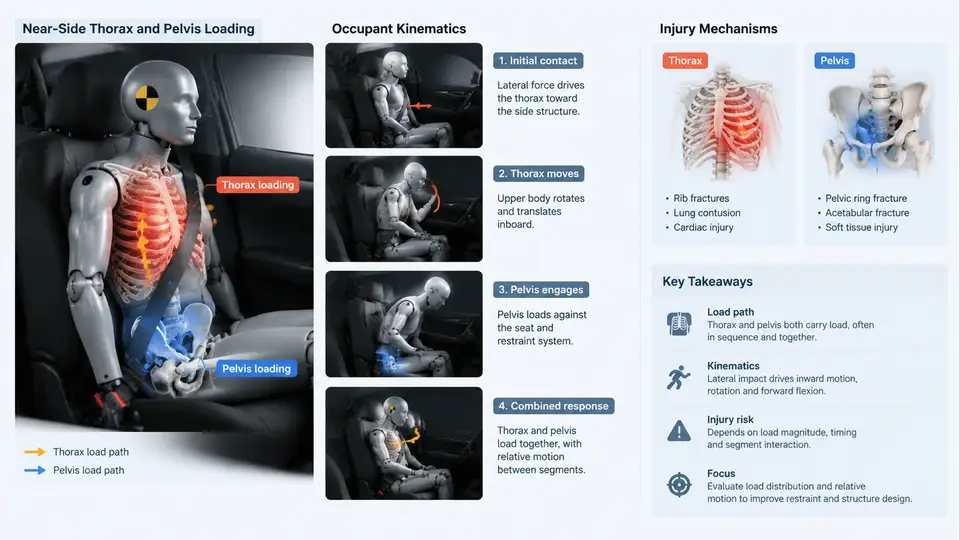
In a near-side impact, the struck side of the occupant is the side closest to the impacting object. Whether the event is a pole strike to the driver's door, a perpendicular car-to-car collision, or a side-sled test, the defining characteristic is that the available crush space between the occupant and the intrusion is very small — often only 200–300 mm of door trim, padding, and structure. Because there is no long front-end crumple zone to manage energy, the near-side load path is short, stiff, and highly sensitive to how forces are introduced into the occupant's body. This chapter establishes the vocabulary and mechanics that the rest of the course builds on: what "near-side thorax and pelvis loading" actually means, how the occupant moves relative to the intruding structure, and which injury mechanisms dominate.
Defining the Near-Side Load Path
A load path is the continuous chain of structural and biological elements through which force is transmitted from the impact interface to the occupant and then to the restraint system and vehicle interior. In near-side impact the chain typically runs: barrier or striking vehicle → door outer panel → door beam / beltline reinforcement → B-pillar and sill → door trim and armrest → occupant's near-side pelvis and thorax → far-side structures and restraints. Each link has a stiffness and a geometry, and the weakest or most poorly aligned link governs the outcome.
Two reference conventions are used throughout this course and must be kept consistent. First, the impact direction is defined as positive along the vector from the striking object toward the occupant (i.e., lateral, from the struck side inward). Second, intrusion is measured as displacement of the door inner trim toward the vehicle centerline, positive inward. When we say a door intrudes 150 mm, we mean the inner trim surface has moved 150 mm along the positive impact direction relative to its pre-impact position. All force, velocity, and displacement signs in later chapters follow this convention unless a change is explicitly stated.
Near-side loading is therefore not a single force but a distributed pressure field applied over the contact area between trim and body. Its severity depends on three interacting quantities: the magnitude of the applied force, the rate at which it is applied (which governs strain rate in tissue and the response of rate-sensitive restraints), and the contact area and location (which determine whether load concentrates on the ribs, the shoulder, the iliac crest, or the greater trochanter).
Occupant Kinematics in the Near-Side Event
Occupant motion in a near-side impact differs fundamentally from frontal loading. In a frontal crash the occupant moves forward into a belt and airbag that have been tuned for that direction. In a near-side event the struck-side door moves into the occupant while the occupant's torso is initially nearly stationary, so the relative velocity across the door-to-occupant gap is what drives loading. The sequence typically unfolds in three phases:
- Contact and pelvis loading (roughly 0–30 ms). The intruding door trim contacts the near-side hip and thigh. The pelvis, being the heaviest and most inferior segment, is loaded first and is pushed laterally. Friction and geometry at the seat cushion determine whether the pelvis slides or is captured.
- Thorax loading and lateral bending (roughly 20–60 ms). As intrusion continues, the armrest and door trim load the lower rib cage and the near-side shoulder. The thorax bends laterally about the spine, and the far-side shoulder is restrained by the belt, producing a bending moment across the rib cage.
- Head and far-side interaction (roughly 50–120 ms). The head, lagging the torso, translates laterally and may contact the intruding trim, the far-side interior, or a side airbag. The far-side occupant, if present, becomes a secondary load path.
The key kinematic insight is that the near-side occupant experiences lateral acceleration of the pelvis and thorax that is applied over a very short distance. Peak lateral acceleration at the pelvis in a severe pole impact can exceed 40–60 g over 10–20 ms, and the resulting velocity change of the torso relative to the vehicle can reach 4–6 m/s before restraints fully engage. This is why side airbags and pelvis-optimized trim geometry matter more than long crush stroke: there is simply no stroke to use.
Injury Mechanisms Specific to Near-Side Loading
Because the load is applied laterally and over a short distance, the dominant injury mechanisms are distinct from frontal impact. Four mechanisms account for most serious near-side thorax and pelvis injuries:
- Rib fracture from lateral bending and local compression. The near-side ribs are loaded in bending between the sternum and the spine, and the contact pressure from the armrest concentrates force on a few ribs. Rib fractures typically begin at the near-side lateral wall and propagate; multiple adjacent fractures produce a flail segment. Rib fracture tolerance in lateral loading is lower than in frontal loading for the same rib because the bending moment arm is shorter and the load is concentrated.
- Pelvis fracture from lateral compression. The iliac wing and the pubic rami are loaded in lateral compression. The pubic symphysis and the sacroiliac joint are the primary load-transfer points; a lateral force applied at the greater trochanter can produce a "lateral compression" pelvic ring injury, with rami fractures and posterior ring disruption. The pelvis is the first structure loaded and often the first to fail.
- Thoracic and abdominal organ loading. Lateral compression of the lower thorax transmits force to the liver, spleen, and kidneys on the struck side. Solid-organ injury correlates with the peak compression and the rate of compression rather than with rib fracture alone.
- Far-side and head injury from occupant excursion. After the near-side structures load the torso, the head and far-side shoulder continue moving, producing neck bending and potential head contact with the far-side interior or the far-side occupant.
From Mechanism to Measurable Quantities
To make these mechanisms tractable, near-side development work uses a small set of measurable quantities that map directly onto the load path. The table below summarizes the quantities, their typical instrumentation, and what they tell you about the load path. Values shown are representative ranges for a mid-size passenger car in a 50 km/h side pole or MDB test and are illustrative, not measured results.
| Quantity | Instrumentation | Typical range (illustrative) | Load-path interpretation |
|---|---|---|---|
| Door inner intrusion | String potentiometer / laser | 80–200 mm at beltline | Available crush stroke before occupant contact |
| Pelvis lateral acceleration | Triaxial accelerometer on pelvis block | 40–70 g peak | Severity of first contact; trim stiffness |
| Thorax lateral acceleration | Accelerometer on rib bar | 30–60 g peak | Timing and magnitude of torso loading |
| Rib deflection | Rib deflection gauge (chest band) | 25–45 mm | Local compression; fracture risk |
| Pelvic force | Load cell in side impact dummy pelvis | 3–6 kN | Force transmitted through the near-side hip |
Reading these quantities together is what turns a test into a load-path diagnosis. A high pelvis acceleration with low intrusion suggests the trim is stiff and contacting early; a high rib deflection with moderate acceleration suggests the load is spread over time but concentrated on the ribs. The next chapters will use these signals to build and validate load-path models, but the diagnostic logic starts here: identify which structure is loaded first, how fast, and over what area, then trace that force through the chain to the injury outcome.
What This Means for Development Work
The practical consequence of near-side load-path fundamentals is that design effort should be directed at three levers, in order of leverage: delay and distribute occupant contact (trim geometry, padding, airbag deployment timing), manage the force introduction into the pelvis and thorax (armrest stiffness, beltline height, seat-mounted side airbag coverage), and control occupant excursion (far-side restraint, seat geometry). Each lever acts on a specific link in the chain described above, and each can be evaluated with the measurable quantities in the table. With this vocabulary in place — impact direction, intrusion, the three kinematic phases, and the four injury mechanisms — the following chapters can move into structural design, restraint calibration, and test-based validation of the near-side load path.