1. Sled testing fundamentals
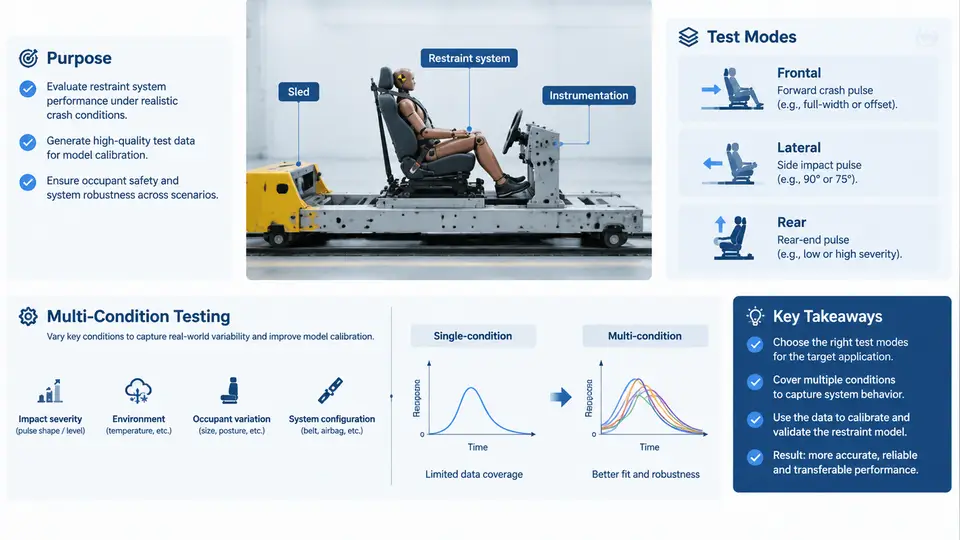
Sled testing is the controlled, laboratory-based reproduction of a vehicle crash pulse applied to a restraint system mounted on a moving platform. Instead of destroying a full vehicle, engineers accelerate a sled carriage along a fixed track, then decelerate it with a programmable braking or hydraulic system so that the resulting acceleration–time history matches a target crash pulse. The restraint system — seat belts, pretensioners, load limiters, airbags, seats, and their mounting structures — experiences realistic inertial loading while instrumentation records the response. This makes sled testing the primary tool for developing and validating occupant restraint performance before, and alongside, full-scale vehicle crash tests.
Why Sled Testing Exists
A full vehicle crash test is expensive, destructive, and slow to iterate. A single frontal barrier test consumes a complete vehicle, and any change to an airbag vent, a retractor torsion bar, or a seat frame requires another vehicle. Sled testing breaks that dependency. The vehicle body is replaced by a rigid or semi-rigid buck that carries the restraint system and instrumented ATDs (Anthropomorphic Test Devices, i.e., crash test dummies). Because the buck is reusable and the pulse is programmable, engineers can run dozens of configurations in the time a single vehicle test would take.
The core purpose can be summarized as follows:
- Isolate restraint performance. By removing the vehicle structure from the loop, the sled test measures how the restraint system itself manages occupant energy, independent of how the body deforms.
- Control the input precisely. The crash pulse is a defined, repeatable input. Two runs with the same pulse and the same buck differ only by the parameter under study.
- Enable parametric iteration. Pretensioner firing time, load limiter force level, airbag vent size, and seat belt geometry can be swept systematically.
- Support regulatory and rating compliance. Many FMVSS and consumer-rating procedures are defined on sled tests, so the sled is also the compliance instrument.
Test Modes
Sled facilities are usually classified by how the pulse is generated and by the direction of loading. The most common modes are:
| Mode | Pulse Generation | Typical Use |
|---|---|---|
| Deceleration sled | Sled is accelerated, then braked by crush tubes, hydraulic absorbers, or a decelerator | Frontal and rear impact pulses; the dominant mode for restraint development |
| Acceleration sled | Sled is pushed by a pneumatic or hydraulic actuator to follow the target pulse | Side impact, rear impact, and pulses that are difficult to produce by braking |
| Biaxial / multi-axis sled | Combined longitudinal and lateral or vertical actuation | Oblique and side impact with occupant kinematics in more than one plane |
| Inverted or reverse sled | Buck is rotated to study specific loading directions | Special studies such as roof or seatback loading |
Direction is described using the vehicle coordinate convention: +X points forward along the vehicle longitudinal axis, +Y points to the driver's left, and +Z points upward. A frontal crash pulse is therefore a large negative-X acceleration of the occupant compartment. This convention must be stated once and held consistently across every pulse, channel, and plot in a test program; mixing sign conventions is one of the most common sources of misinterpretation when comparing sled data to vehicle data.
From Single Pulse to Multi-Condition Testing
Early restraint development often starts with one representative pulse — for example, a 56 km/h frontal rigid barrier pulse — and a single occupant size. That is sufficient to establish a baseline, but it is not sufficient to release a restraint system. Real-world crashes vary in severity, direction, occupant size, seating position, and belt usage. A restraint system tuned only to one pulse can pass that pulse and still produce poor outcomes in a lower-severity or out-of-position scenario.
Multi-condition sled testing addresses this by treating the restraint system as a design that must satisfy a family of load cases rather than a single point. The condition matrix typically varies along several axes:
- Crash severity and pulse shape. Low-speed (e.g., 25–30 km/h), mid-speed, and high-speed pulses, plus pulses with different rise times and peak levels.
- Impact direction. Frontal, oblique, side, and rear, each with its own pulse and occupant loading path.
- Occupant size and mass. 5th percentile female, 50th percentile male, and 95th percentile male ATDs, plus child restraint configurations.
- Seating position and posture. Nominal, forward-most, reclined, and out-of-position (OOP) cases.
- Belt usage and deployment state. Belted, unbelted, pretensioner fired or not, airbag suppressed or enabled.
The engineering value of this matrix is that it exposes trade-offs. A load limiter soft enough to protect a small occupant at low severity may allow excessive forward excursion for a heavy occupant at high severity. A pretensioner firing early enough to reduce belt slack in a frontal pulse may be too aggressive in a lower-severity event. These conflicts only become visible when the conditions are run together and the results are compared on a common basis.
What a Sled Test Actually Measures
The sled test produces time-history data, not a single pass/fail number. The primary channels are:
- Sled acceleration in X, Y, and Z, used to verify that the achieved pulse matches the target pulse within tolerance.
- ATD head acceleration and the derived Head Injury Criterion (HIC), plus head excursion and head contact status.
- Chest deflection and acceleration, used for chest injury criteria.
- Pelvis and femur loads, and for side impact, rib deflection and abdominal pressure.
- Belt force at the retractor, anchor, and buckle, which reveals how the load limiter and pretensioner are behaving.
- Airbag pressure or vent flow, where instrumented, to correlate deployment with occupant contact timing.
Before any of these are interpreted, the pulse itself must be validated. A typical acceptance criterion is that the achieved sled acceleration stays within a defined corridor — for example, ±10% of the target peak and within a specified time window around the target rise — across the duration of the pulse. If the pulse is out of corridor, the occupant response is not comparable to the reference condition, and the run should be repeated rather than interpreted.
How Multi-Condition Testing Fits the Development Cycle
In a typical restraint development program, sled testing appears in three phases. First, concept screening uses a small number of representative pulses to compare candidate architectures — for example, a dual-stage airbag versus a single-stage with a larger vent. Second, parameter optimization sweeps the condition matrix to tune pretensioner timing, load limiter force, and vent area against injury criteria. Third, validation runs the full regulatory and internal matrix to confirm that the final calibration holds across all conditions, including the worst-case combinations identified during optimization.
The output of the second phase is often a calibration table rather than a single setting. For example, a restraint control module may fire the pretensioner at a time that depends on the sensed crash severity, and the sled matrix is what establishes the mapping between severity and firing time. Without multi-condition data, that mapping cannot be justified.
Common Pitfalls
- Treating the sled pulse as the vehicle pulse. The sled pulse is a target derived from vehicle data; it is not the vehicle pulse itself. Corridor tolerances and filtering must be documented.
- Over-tuning to one condition. A calibration that minimizes HIC at 56 km/h frontal may increase chest deflection at 30 km/h or for a 5th percentile female occupant.
- Ignoring out-of-position cases. OOP tests often govern airbag venting and suppression logic, and they are frequently the limiting condition.
- Inconsistent sign and coordinate conventions. A pulse plotted with the wrong sign can invert the apparent occupant kinematics and lead to incorrect conclusions.
Sled testing is therefore not simply a cheaper crash test. It is the instrument that lets engineers separate restraint behavior from vehicle behavior, iterate quickly, and — through multi-condition testing — understand where a restraint system's performance is robust and where it is not. That understanding is the foundation for the restraint model calibration work that follows.