3. 使用AES-GCM进行对称加密与认证
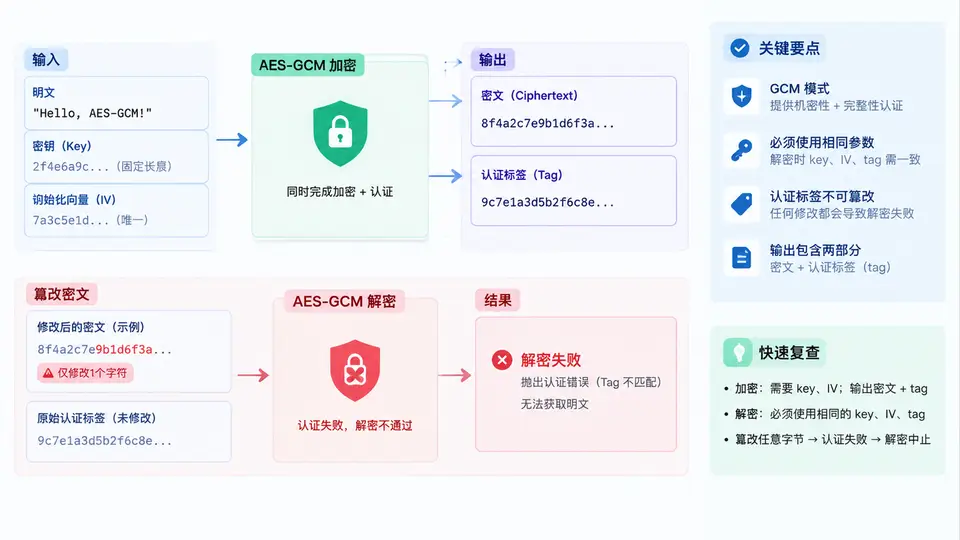
AES-GCM 的输入、输出与认证边界
AES-GCM 把“加密”和“完整性认证”合并成一次调用:同一把密钥、同一个 nonce 下,输出密文与 16 字节认证标签(Tag)。解密时若密文、AAD 或 Tag 任一被改动,认证失败,API 应抛出异常而不是返回错误明文。下面用一段可运行的 Python 示例演示完整闭环。
关键参数与约束
| 参数 | 推荐值 | 说明 |
|---|---|---|
| Key | 256 bit(32 字节) | AES-256-GCM;也可用 128 bit |
| Nonce / IV | 96 bit(12 字节) | 同一密钥下绝不可重复;推荐随机生成 |
| Tag 长度 | 128 bit(16 字节) | 可截短但会降低认证强度,不建议 |
| AAD | 可为空 | 参与认证但不加密,适合放头部元数据 |
Nonce 复用是 AES-GCM 最致命的错误:同一密钥下重复使用同一 Nonce,会泄露明文异或关系并可能被伪造 Tag。每次加密必须使用新的随机 Nonce,并将 Nonce 与密文一起存储/传输。
完整可运行示例(Python + cryptography)
from cryptography.hazmat.primitives.ciphers.aead import AESGCM
import os

# 1. 生成 256 bit 密钥与 96 bit 随机 Nonce
key = AESGCM.generate_key(bit_length=256)
nonce = os.urandom(12)

# 2. 待加密明文与附加认证数据
plaintext = b"Transfer 100 CNY to account 6222****1234"
aad = b"order-id:20240521-001"

# 3. 加密:返回 密文 || Tag(Tag 为最后 16 字节)
aesgcm = AESGCM(key)
ct_and_tag = aesgcm.encrypt(nonce, plaintext, aad)
ciphertext, tag = ct_and_tag[:-16], ct_and_tag[-16:]
print("密文长度:", len(ciphertext), "Tag 长度:", len(tag))

# 4. 正常解密:Tag 校验通过,返回原始明文
recovered = aesgcm.decrypt(nonce, ct_and_tag, aad)
assert recovered == plaintext
print("解密成功:", recovered.decode())

# 5. 篡改密文:翻转第 0 字节的 1 bit
tampered = bytearray(ct_and_tag)
tampered[0] ^= 0x01
try:
    aesgcm.decrypt(nonce, bytes(tampered), aad)
    print("不应到达这里")
except Exception as e:
    print("篡改后解密失败:", type(e).__name__)

# 6. 篡改 AAD 同样会失败
try:
    aesgcm.decrypt(nonce, ct_and_tag, b"order-id:20240521-999")
except Exception as e:
    print("AAD 被改后解密失败:", type(e).__name__)
运行与判读
- 正常路径:
decrypt返回与plaintext完全一致的字节串,assert通过。 - 篡改密文:
decrypt抛出InvalidTag(cryptography 库的异常类型),不会返回任何明文。 - 篡改 AAD:同样抛出
InvalidTag,说明 AAD 虽不加密但受完整性保护。 - 若把 Nonce 改掉再解密,也会认证失败——Nonce 是 Tag 计算的输入之一。
工程落地时,把
nonce 与 ct_and_tag 一起序列化存储(例如 nonce || ciphertext || tag),解密方按固定长度切分即可。切勿把 Nonce 当作秘密,它只需唯一,不需保密。