1. 构建最小图像预处理流水线
任务说明
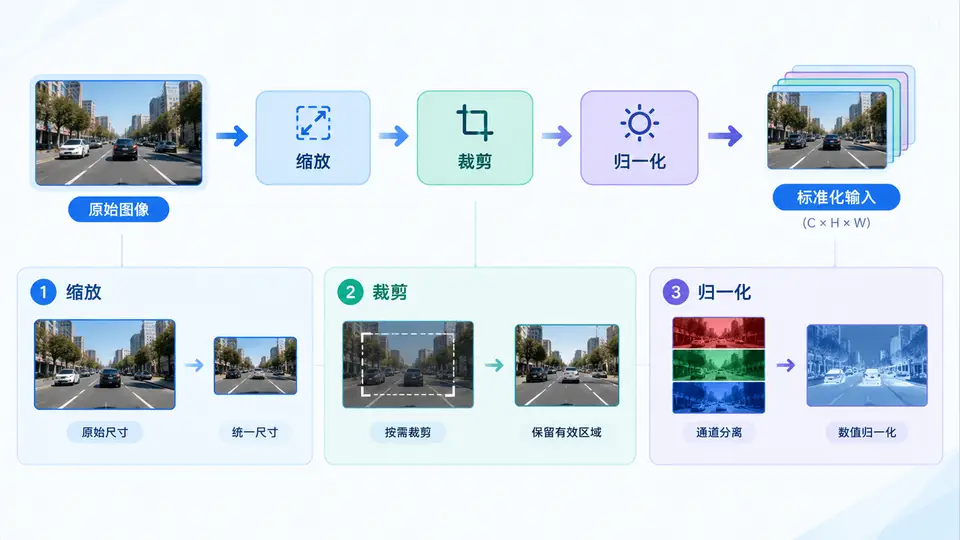
本案例构建一个最小可复用的图像预处理流水线,将任意输入图像转换为后续神经网络模型所需的标准张量输入。流水线包含三个核心步骤:缩放(保持宽高比的resize)、中心裁剪(crop至目标尺寸)、归一化(像素值从[0,255]映射到[0,1]并标准化)。输出为形状为(1, 3, H, W)的浮点张量,适配PyTorch模型的默认输入格式(NCHW)。
实现方案
使用OpenCV读取图像(BGR格式),转换为RGB后依次执行缩放、中心裁剪和归一化。归一化采用两步:先将像素值除以255映射到[0,1],再使用ImageNet数据集的均值与标准差进行标准化。代码封装为单一函数preprocess_image(),输入为图像文件路径,输出为可直接送入模型的张量。
代码实现
import cv2
import numpy as np
import torch

def preprocess_image(image_path, target_size=224, resize_size=256):
    """
    图像预处理流水线:读取 → 缩放 → 中心裁剪 → 归一化

    Args:
        image_path: 输入图像文件路径
        target_size: 最终输出尺寸(正方形边长)
        resize_size: 缩放阶段的短边长度

    Returns:
        torch.Tensor: 形状为 (1, 3, target_size, target_size) 的浮点张量
    """
    # 1. 读取图像并转换颜色空间
    img = cv2.imread(image_path)
    if img is None:
        raise FileNotFoundError(f"无法读取图像: {image_path}")
    img = cv2.cvtColor(img, cv2.COLOR_BGR2RGB)

    # 2. 缩放:保持宽高比,短边缩放到 resize_size
    h, w = img.shape[:2]
    scale = resize_size / min(h, w)
    new_h, new_w = int(round(h * scale)), int(round(w * scale))
    img = cv2.resize(img, (new_w, new_h), interpolation=cv2.INTER_AREA)

    # 3. 中心裁剪:从中心裁出 target_size × target_size 区域
    h, w = img.shape[:2]
    start_y = (h - target_size) // 2
    start_x = (w - target_size) // 2
    img = img[start_y:start_y + target_size, start_x:start_x + target_size]

    # 4. 归一化:像素值映射到 [0,1] 后标准化
    img = img.astype(np.float32) / 255.0

    # ImageNet 标准化参数
    mean = np.array([0.485, 0.456, 0.406], dtype=np.float32)
    std = np.array([0.229, 0.224, 0.225], dtype=np.float32)
    img = (img - mean) / std

    # 转换为 PyTorch 张量并添加 batch 维度
    # 从 HWC 转为 CHW
    tensor = torch.from_numpy(img).permute(2, 0, 1)
    tensor = tensor.unsqueeze(0)  # 添加 batch 维度

    return tensor

# 使用示例
if __name__ == "__main__":
    # 输入图像路径(请替换为实际存在的图像文件)
    input_image = "sample.jpg"

    # 执行预处理
    output_tensor = preprocess_image(input_image)

    # 验证输出形状
    print(f"输出张量形状: {output_tensor.shape}")
    print(f"数据类型: {output_tensor.dtype}")
    print(f"像素值范围: [{output_tensor.min().item():.3f}, {output_tensor.max().item():.3f}]")
落地与验证
依赖安装:需要opencv-python、numpy、torch。使用pip install opencv-python numpy torch安装。
运行方式:将代码保存为preprocess.py,准备一张任意尺寸的sample.jpg图像放在同目录,执行python preprocess.py。
验证方法:观察程序输出,满足以下条件即判定通过:
- 输出张量形状为
torch.Size([1, 3, 224, 224]); - 数据类型为
torch.float32; - 像素值范围大致在
[-2.5, 2.5]区间内(标准化后典型范围)。
预期输出示例:对于一张常规自然图像,输出形状为torch.Size([1, 3, 224, 224]),数据类型为torch.float32,像素值范围约为[-2.117, 2.640](具体数值取决于输入图像内容,但必然落在标准化后的合理区间内)。