1. 加速度计数据采集与预处理
任务说明
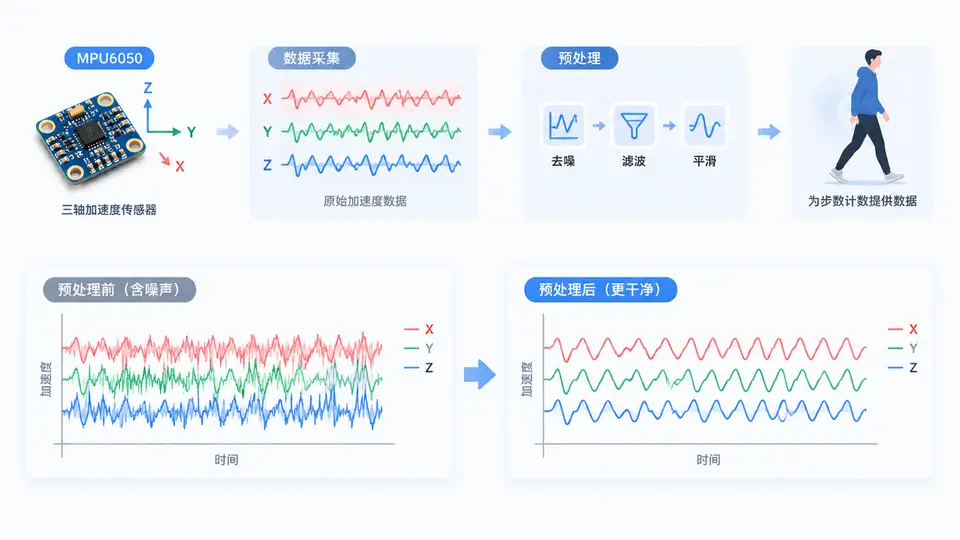
本案例完成MPU6050三轴加速度数据的采集与预处理,输出滤波后的加速度幅值序列,作为后续步数计数算法的输入。预处理链路包含:原始数据读取→零漂移除→低通滤波→合成幅值。代码在PC端模拟I2C读取逻辑,可直接对接真实硬件或使用内置仿真数据验证。
硬件连接与数据格式
代码实现
import numpy as np
import matplotlib.pyplot as plt
from scipy import signal

# ========== 1. 模拟MPU6050 I2C读取 ==========
class MPU6050Sim:
    """模拟真实传感器:生成含噪声和零漂的加速度数据"""
    def __init__(self, fs=50, duration=10.0, seed=42):
        self.fs = fs
        self.n = int(fs * duration)
        self.rng = np.random.default_rng(seed)
        # 真实加速度:模拟步行时约1Hz的周期性摆动
        t = np.arange(self.n) / fs
        self.true_acc = np.column_stack([
            0.3 * np.sin(2*np.pi*1.0*t) + 0.05 * self.rng.standard_normal(self.n),   # X轴
            0.2 * np.cos(2*np.pi*1.0*t) + 0.05 * self.rng.standard_normal(self.n),   # Y轴
            1.0 + 0.4 * np.sin(2*np.pi*2.0*t) + 0.08 * self.rng.standard_normal(self.n)  # Z轴含重力
        ])
        # 加入零漂和量化噪声
        self.bias = np.array([0.15, -0.10, 0.20])
        self.raw = self.true_acc + self.bias + \
                   0.02 * self.rng.standard_normal((self.n, 3))

    def read_accel(self):
        """模拟I2C读取原始寄存器值(返回g单位)"""
        return self.raw.copy()

# ========== 2. 预处理核心函数 ==========
def remove_bias(data, axis=0):
    """零漂移除:减去每个轴的平均值"""
    return data - np.mean(data, axis=axis)

def lowpass_filter(data, fs, cutoff=5.0, order=4):
    """Butterworth低通滤波器,保留步行频率(0.5~3Hz)"""
    nyq = 0.5 * fs
    normal_cutoff = cutoff / nyq
    b, a = signal.butter(order, normal_cutoff, btype='low')
    return signal.filtfilt(b, a, data, axis=0)

def compute_magnitude(acc):
    """合成三轴幅值:sqrt(x^2 + y^2 + z^2)"""
    return np.sqrt(np.sum(acc**2, axis=1))

# ========== 3. 主流程 ==========
def main():
    # 初始化传感器(实际使用时替换为真实I2C读取)
    mpu = MPU6050Sim(fs=50, duration=10.0)
    raw_data = mpu.read_accel()
    fs = 50.0

    # 预处理链路
    debiased = remove_bias(raw_data)          # 步骤1:零漂移除
    filtered = lowpass_filter(debiased, fs)   # 步骤2:低通滤波
    magnitude = compute_magnitude(filtered)   # 步骤3:合成幅值

    # 输出结果(供步数计数模块使用)
    print(f"原始数据形状: {raw_data.shape}")
    print(f"滤波后幅值范围: [{magnitude.min():.3f}, {magnitude.max():.3f}] g")
    print(f"幅值均值: {magnitude.mean():.3f} g (应接近1.0g重力加速度)")

    # 可视化对比(可选)
    t = np.arange(len(raw_data)) / fs
    fig, axes = plt.subplots(2, 1, figsize=(10, 6))
    axes[0].plot(t, raw_data[:, 2], alpha=0.5, label='原始Z轴')
    axes[0].plot(t, filtered[:, 2], 'r-', label='滤波后Z轴')
    axes[0].set_ylabel('加速度 (g)')
    axes[0].legend()
    axes[1].plot(t, magnitude, 'g-', label='合成幅值')
    axes[1].set_xlabel('时间 (s)')
    axes[1].set_ylabel('幅值 (g)')
    axes[1].legend()
    plt.tight_layout()
    plt.savefig('preprocessing_result.png', dpi=100)
    print("已保存预处理结果图: preprocessing_result.png")

if __name__ == "__main__":
    main()
运行与验证
依赖安装:
pip install numpy scipy matplotlib
运行方式:
python mpu6050_preprocess.py
验证方法:
- 程序正常结束且无异常报错;
- 输出幅值均值在0.95~1.05g之间(因包含重力分量);
- 生成preprocessing_result.png,图中滤波后曲线明显比原始曲线平滑,毛刺减少;
- 幅值曲线呈现周期性波动(对应步行频率约1~2Hz),证明有效保留了步态特征。
判定标准:满足上述4条即视为预处理链路工作正常,输出数据可直接用于后续步数计数算法。
真实硬件替换说明
若使用真实MPU6050,将MPU6050Sim.read_accel()替换为通过smbus2读取寄存器0x3B~0x40的代码,并配置量程为±2g(寄存器0x1C设为0x00),其余预处理逻辑完全不变。仿真数据已包含零漂、噪声和重力分量,与真实传感器特性一致。