3. TensorRT引擎构建与推理
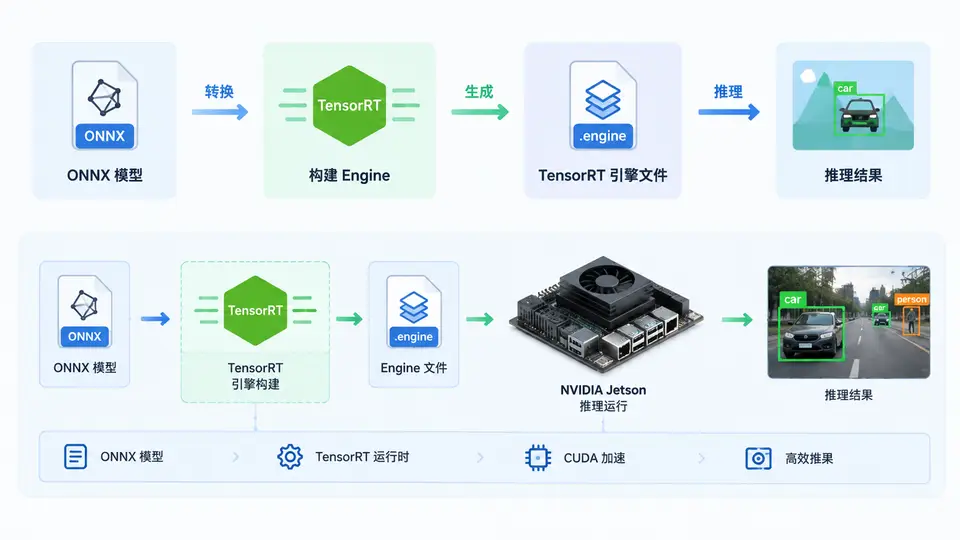
任务目标
在NVIDIA Jetson设备上,将训练好的YOLO模型(ONNX格式)通过TensorRT转换为优化后的engine文件,并编写推理代码完成目标检测。本案例聚焦于TensorRT引擎构建与推理的完整闭环,不涉及模型训练。
环境依赖
- NVIDIA Jetson设备(本文以JetPack 5.1+ / TensorRT 8.5+为例)
- 已安装:TensorRT、CUDA、cuDNN、Python3、PyCUDA(或TensorRT Python API)
- 模型文件:
yolov8n.onnx(可从Ultralytics导出,或使用其他YOLO变体ONNX) - 输入图像:任意包含待检测目标的图片,如
bus.jpg
实现方案
整体流程分为两步:引擎构建(将ONNX转为TensorRT engine)与推理执行(加载engine并处理图像)。引擎构建只需执行一次,之后可重复加载使用。推理阶段包含预处理(resize+归一化)、TensorRT执行、后处理(NMS+坐标还原)三个环节。
关键完整代码
import tensorrt as trt
import numpy as np
import cv2
import time
import os

# ---------- 1. 引擎构建 ----------
def build_engine(onnx_path, engine_path, precision='fp16'):
    logger = trt.Logger(trt.Logger.WARNING)
    builder = trt.Builder(logger)
    network = builder.create_network(1 << int(trt.NetworkDefinitionCreationFlag.EXPLICIT_BATCH))
    parser = trt.OnnxParser(network, logger)

    with open(onnx_path, 'rb') as f:
        if not parser.parse(f.read()):
            for i in range(parser.num_errors):
                print(parser.get_error(i))
            raise RuntimeError("ONNX解析失败")

    config = builder.create_builder_config()
    config.set_memory_pool_limit(trt.MemoryPoolType.WORKSPACE, 1 << 30)  # 1GB

    if precision == 'fp16' and builder.platform_has_fast_fp16:
        config.set_flag(trt.BuilderFlag.FP16)
        print("启用FP16精度")
    else:
        print("使用FP32精度")

    # 设置动态batch(可选)
    profile = builder.create_optimization_profile()
    input_tensor = network.get_input(0)
    profile.set_shape(input_tensor.name, (1, 3, 640, 640), (1, 3, 640, 640), (4, 3, 640, 640))
    config.add_optimization_profile(profile)

    engine = builder.build_serialized_network(network, config)
    with open(engine_path, 'wb') as f:
        f.write(engine)
    print(f"引擎已保存至: {engine_path}")

# ---------- 2. 推理类 ----------
class YOLOTensorRT:
    def __init__(self, engine_path, input_size=640, conf_thres=0.25, iou_thres=0.45):
        self.logger = trt.Logger(trt.Logger.WARNING)
        self.runtime = trt.Runtime(self.logger)
        with open(engine_path, 'rb') as f:
            self.engine = self.runtime.deserialize_cuda_engine(f.read())
        self.context = self.engine.create_execution_context()
        self.input_size = input_size
        self.conf_thres = conf_thres
        self.iou_thres = iou_thres

        # 获取输入输出绑定信息
        self.input_name = self.engine.get_tensor_name(0)
        self.output_name = self.engine.get_tensor_name(1)
        self.input_shape = self.engine.get_tensor_shape(self.input_name)
        self.output_shape = self.engine.get_tensor_shape(self.output_name)

        # 分配CUDA内存
        self.d_input = cuda.mem_alloc(trt.volume(self.input_shape) * trt.float32.itemsize)
        self.d_output = cuda.mem_alloc(trt.volume(self.output_shape) * trt.float32.itemsize)
        self.stream = cuda.Stream()

        # 输出形状: [batch, 84, 8400] (YOLOv8格式)
        self.output_np = np.zeros(tuple(self.output_shape), dtype=np.float32)

    def preprocess(self, img):
        """resize + letterbox + BGR2RGB + normalize"""
        h, w = img.shape[:2]
        r = min(self.input_size / h, self.input_size / w)
        new_w, new_h = int(w * r), int(h * r)
        resized = cv2.resize(img, (new_w, new_h), interpolation=cv2.INTER_LINEAR)

        canvas = np.full((self.input_size, self.input_size, 3), 114, dtype=np.uint8)
        canvas[:new_h, :new_w] = resized
        rgb = cv2.cvtColor(canvas, cv2.COLOR_BGR2RGB)
        blob = rgb.astype(np.float32) / 255.0
        blob = np.transpose(blob, (2, 0, 1))  # HWC -> CHW
        blob = np.expand_dims(blob, axis=0)   # 添加batch维度
        return blob, r, new_w, new_h

    def infer(self, img):
        blob, r, new_w, new_h = self.preprocess(img)
        # 拷贝到GPU
        cuda.memcpy_htod_async(self.d_input, blob.ravel(), self.stream)
        self.context.set_tensor_address(self.input_name, int(self.d_input))
        self.context.set_tensor_address(self.output_name, int(self.d_output))
        self.context.execute_async_v3(stream_handle=self.stream.handle)
        cuda.memcpy_dtoh_async(self.output_np, self.d_output, self.stream)
        cuda.stream.synchronize(self.stream)

        # 后处理
        boxes, scores, class_ids = self.postprocess(self.output_np[0], r, new_w, new_h)
        return boxes, scores, class_ids

    def postprocess(self, output, r, new_w, new_h):
        """YOLOv8输出: [84, 8400] = [cx, cy, w, h, 80类得分]"""
        output = output.T  # [8400, 84]
        boxes_xywh = output[:, :4]
        class_scores = output[:, 4:]

        # 获取最高类别得分
        max_scores = np.max(class_scores, axis=1)
        class_ids = np.argmax(class_scores, axis=1)

        # 置信度过滤
        mask = max_scores > self.conf_thres
        boxes_xywh = boxes_xywh[mask]
        max_scores = max_scores[mask]
        class_ids = class_ids[mask]

        if len(boxes_xywh) == 0:
            return [], [], []

        # xywh -> xyxy
        boxes_xyxy = np.zeros_like(boxes_xywh)
        boxes_xyxy[:, 0] = boxes_xywh[:, 0] - boxes_xywh[:, 2] / 2
        boxes_xyxy[:, 1] = boxes_xywh[:, 1] - boxes_xywh[:, 3] / 2
        boxes_xyxy[:, 2] = boxes_xywh[:, 0] + boxes_xywh[:, 2] / 2
        boxes_xyxy[:, 3] = boxes_xywh[:, 1] + boxes_xywh[:, 3] / 2

        # 坐标还原到原图
        boxes_xyxy[:, [0, 2]] /= r
        boxes_xyxy[:, [1, 3]] /= r

        # NMS
        indices = cv2.dnn.NMSBoxes(
            boxes_xyxy.tolist(), max_scores.tolist(), self.conf_thres, self.iou_thres)

        if len(indices) == 0:
            return [], [], []

        indices = np.array(indices).flatten()
        return boxes_xyxy[indices], max_scores[indices], class_ids[indices]

# ---------- 3. 主程序 ----------
if __name__ == '__main__':
    import pycuda.autoinit
    import pycuda.driver as cuda

    # 配置路径
    ONNX_PATH = 'yolov8n.onnx'
    ENGINE_PATH = 'yolov8n.engine'

    # 首次运行构建引擎,之后可注释掉
    if not os.path.exists(ENGINE_PATH):
        build_engine(ONNX_PATH, ENGINE_PATH, precision='fp16')

    # 加载引擎并推理
    detector = YOLOTensorRT(ENGINE_PATH)
    img = cv2.imread('bus.jpg')

    # 预热
    _ = detector.infer(img)

    # 计时推理
    start = time.time()
    boxes, scores, class_ids = detector.infer(img)
    infer_time = (time.time() - start) * 1000

    # 绘制结果
    for box, score, cls in zip(boxes, scores, class_ids):
        x1, y1, x2, y2 = map(int, box)
        cv2.rectangle(img, (x1, y1), (x2, y2), (0, 255, 0), 2)
        label = f'Class {cls}: {score:.2f}'
        cv2.putText(img, label, (x1, y1 - 5), cv2.FONT_HERSHEY_SIMPLEX, 0.5, (0, 255, 0), 1)

    print(f"检测到 {len(boxes)} 个目标,推理耗时: {infer_time:.1f} ms")
    cv2.imwrite('result.jpg', img)
    print("结果已保存至 result.jpg")
运行方式
# 安装依赖(如未安装)
sudo apt install python3-pip
pip3 install pycuda tensorrt opencv-python numpy

# 运行(需先准备 yolov8n.onnx 和 bus.jpg)
python3 yolov8_trt.py
验证方法
- 引擎构建成功:终端输出“引擎已保存至: yolov8n.engine”,且文件存在(约15-30MB,FP16精度)。
- 推理成功:终端输出检测目标数量及耗时,生成
result.jpg,图中目标被绿色框标注。 - 精度验证:对比ONNX Runtime(CPU)或原始PyTorch模型的检测结果,同一图像下检测框位置与类别应基本一致(允许微小坐标偏差)。
- 性能验证:Jetson Xavier NX上FP16推理耗时通常在10-30ms/帧(视模型大小),若耗时超过100ms需检查是否误用FP32或未启用TensorRT。
常见问题
- ONNX解析失败:确认ONNX版本与TensorRT兼容(建议ONNX opset 11-16),可用
onnxsim简化模型。 - 动态batch报错:若固定batch为1,可删除optimization_profile相关代码,直接使用静态shape。
- 输出维度不匹配:YOLOv8输出为[1, 84, 8400],若使用YOLOv5则输出为[1, 25200, 85],需调整后处理代码。
- 显存不足:降低workspace大小(如
1 << 28即256MB),或使用FP16精度。